
Ariston E-Combi: Expansion Vessel Depressurisation And Recharging Walkthrough
The expansion vessel in your Ariston E-Combi boiler maintains system pressure by accommodating water expansion during heating cycles. When this vessel loses its pre-charge pressure, you'll notice frequent pressure drops, the pressure relief valve discharge activating, or the boiler failing to maintain adequate system pressure. This walkthrough covers the complete expansion vessel depressurisation and recharging process based on field experience with these units.
Why Expansion Vessels Lose Pressure
Expansion vessels contain a rubber diaphragm separating air (or nitrogen) on one side from system water on the other. Over time, three factors cause pressure loss. The most common is diaphragm permeation. Gas molecules slowly migrate through the rubber membrane, typically losing 0.1 to 0.2 bar annually in normal conditions. Think of diaphragm permeation like a child's helium balloon slowly deflating over a week. The rubber seems completely solid, but microscopic gas molecules still find their way through the material over time.
Another factor is valve core deterioration. The Schrader valve core can develop leaks around the core or seal. This accelerates pressure loss from years to weeks. Finally, there is diaphragm failure. A ruptured diaphragm allows water into the air chamber. You'll see water discharge when you press the Schrader valve core, indicating complete vessel failure requiring replacement. Most E-Combi units Heating and Plumbing World service show pressure loss from permeation rather than catastrophic failure.
Tools And Materials Required
You'll need specific equipment for this procedure. A quality pressure gauge reading 0 to 4 bar is essential for an accurate pre-charge pressure measurement. You also require a bicycle pump with a built-in gauge or a professional nitrogen charging kit. Standard hand tools such as a flat-head screwdriver and an adjustable spanner are necessary for plastic cap removal and accessing the expansion vessel during the service.
The valve on Ariston units accepts standard tyre pump connections. While nitrogen charging kits provide more precise control, a quality bicycle pump works for residential applications. Professional installers often keep a valve core removal tool handy for stubborn valves that have corroded over several years of neglect.
Safety Precautions Before Starting
Electrical isolation is the first step. Switch off the boiler at the fused spur, not just the boiler controls. The pump can activate unexpectedly during the process of expansion vessel depressurisation. You must also allow for complete cooling. System water must reach ambient temperature. Hot water expands, giving false pressure readings and creating a scalding risk. It is best to wait a minimum of 2 hours after the last heating cycle.
Check the manufacturer specifications for your specific model. Ariston specifies a 0.5 to 1.0 bar pre-charge for E-Combi vessels, but always verify this on the rating plate. Finally, protect the surrounding area. Water will drain during the process. Position absorbent materials around the work area to protect electrics and flooring from accidental spills.
Depressurising The Heating System
The expansion vessel cannot be accurately recharged while connected to active system water pressure. You must perform a systematic expansion vessel depressurisation first. Locate the drain valve beneath the boiler. E-Combi units typically use a square-head valve requiring a quarter turn. Attach a drainage hose to the outlet and run it to a suitable discharge point.
Open the drain valve slowly by turning it anticlockwise. Water will flow steadily as the pressure drops. To ensure a smooth flow, open an upstairs radiator bleed valve. This breaks the vacuum forming in the system and allows for complete drainage. Monitor the pressure gauge on the boiler front until it reads zero. You do not need to drain the entire system for this maintenance. Removing 2 to 4 litres of water is usually sufficient to reach zero bar.
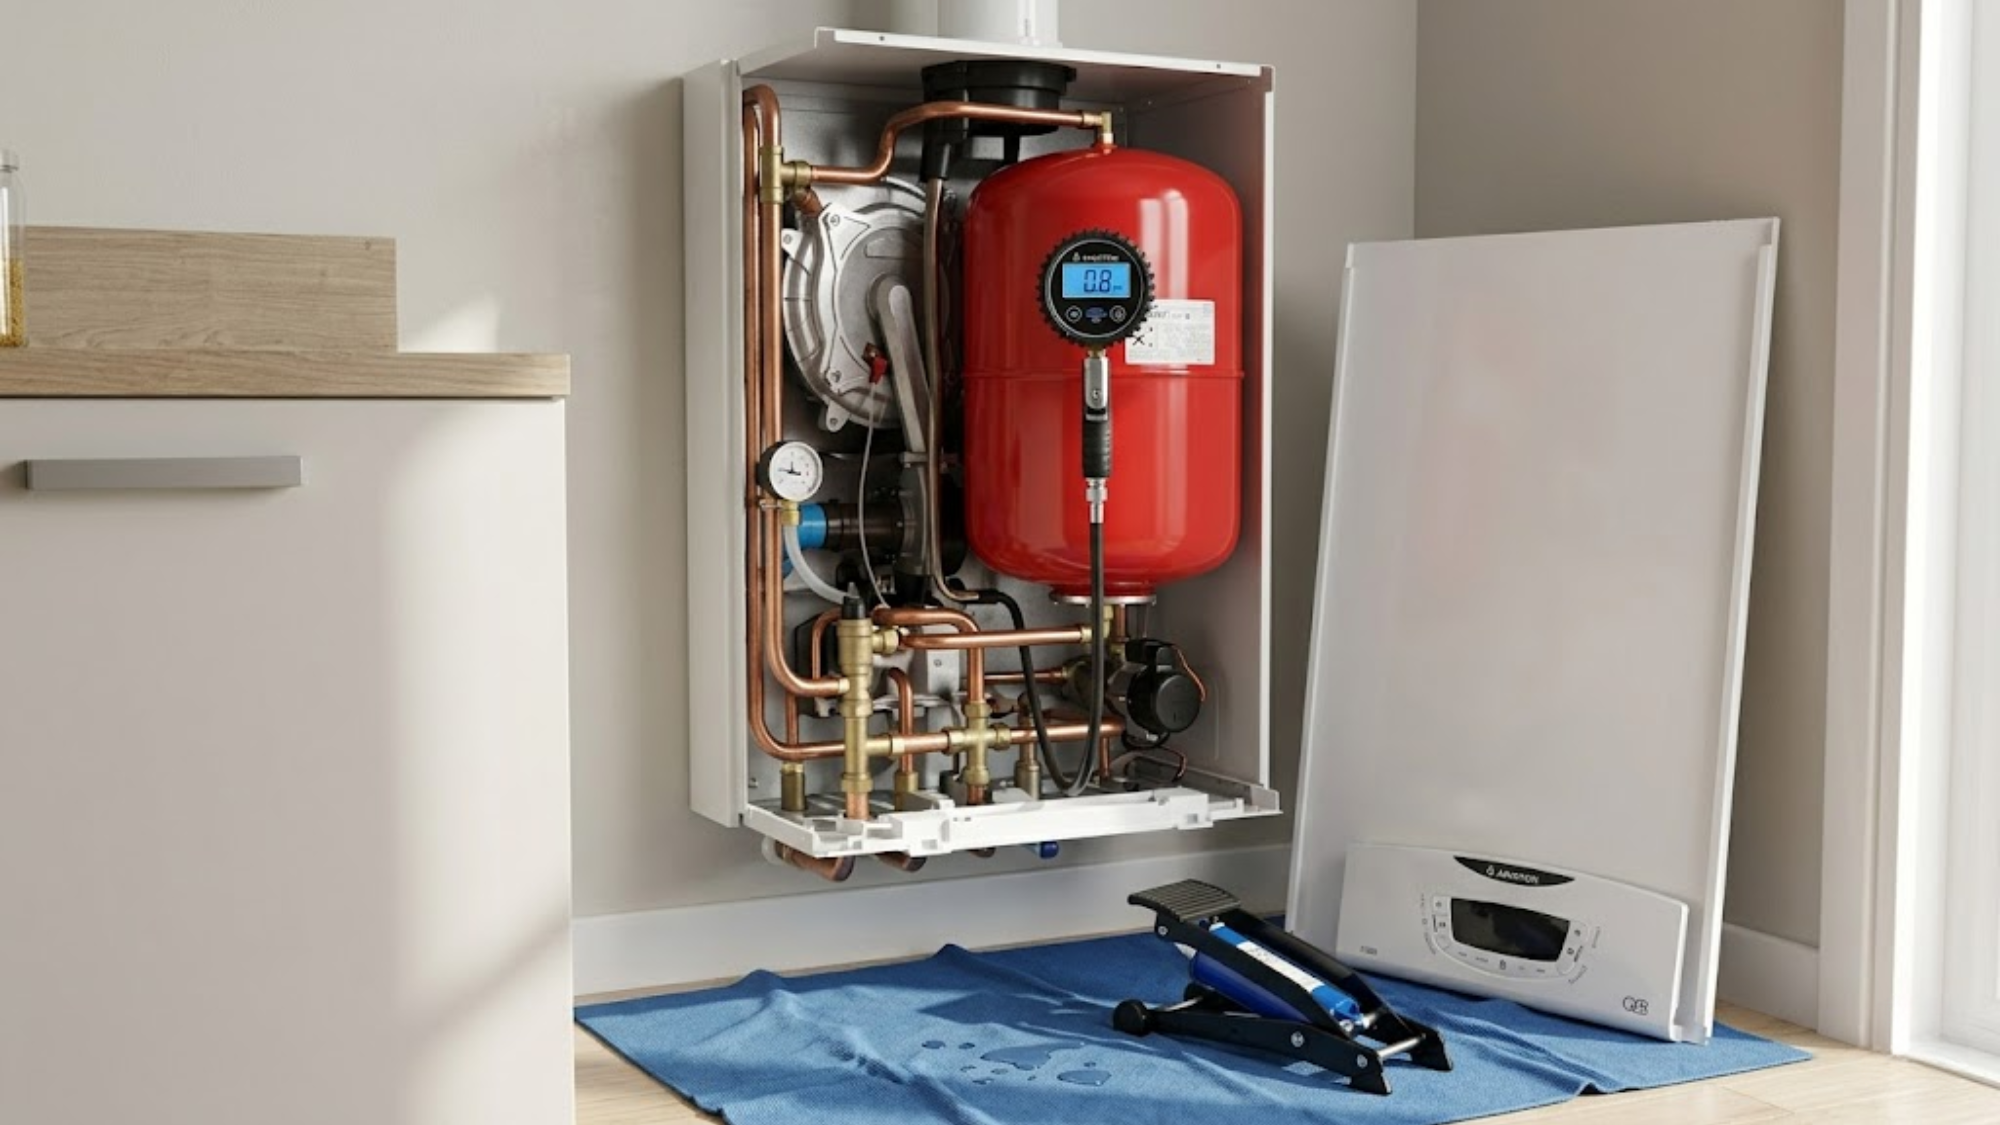
Accessing The Expansion Vessel
The expansion vessel location varies, but most E-Combi models position it inside the boiler casing on the right side. Remove the front panel by releasing the bottom clips or screws. The vessel appears as a red cylindrical tank. Identify the Schrader valve core located on top or at one end of the vessel. This is where you will check the expansion vessel pressure during the walkthrough.
Unscrew the plastic protective cap. For vessels mounted in tight spaces, you may need to partially disconnect the system connection nut. Rotate the vessel just enough to bring the valve into an accessible position. Do not fully remove the vessel unless you have confirmed a ruptured diaphragm or severe corrosion.
Checking Current Vessel Pressure
Before adding any air, you must perform a pre-charge pressure measurement to assess the vessel condition. On a recent commercial project, a junior engineer tried checking the pressure on an E-Combi vessel without checking if the system was isolated first. The resulting spray of 70-degree water was a messy lesson in why we always let the system cool down before touching the internal components.
Press the Schrader valve core briefly with a small screwdriver. If water sprays out, the diaphragm has failed. The boiler expansion vessel requires replacement in this scenario. If the core is dry, connect your pressure gauge. Quality gauges seal immediately. Record the reading. Healthy vessels should show 0.5 to 1.0 bar when depressurised. Readings at zero indicate a complete loss of air, but the diaphragm may still be intact.
Recharging The Expansion Vessel
With the system depressurised, you can recharge the vessel to the required specification. Target a charge of 0.8 to 1.0 bar for systems with a 1.5 bar operating pressure. It's a professional standard to keep the pre-charge 0.2 bar below the cold fill pressure. If the heating system expansion vessel is at zero, it will take several minutes to reach the target.
Connect your pump to the valve. Pump slowly and check the gauge after every few strokes. Rapid pumping generates heat through compression, which gives falsely high readings that drop as the air cools. Once you reach the target pressure, disconnect the pump. Verify pressure retention by waiting 5 minutes. Any drop indicates a leaking Schrader valve core or diaphragm permeation issues. Replace the protective cap once the stability test is successful.
Repressurising The Heating System
With the vessel recharged, you must restore the system pressure to normal levels. Close the drain valve and the radiator bleed valve you opened earlier. Locate the filling loop, which is either an internal key or an external flexible hose. Open the filling valves slowly and listen for water entering the circuit.
Watch the boiler gauge and fill to 1.2 or 1.5 bar. Do not exceed 2.0 bar, as this may trigger the pressure relief valve discharge. Close the filling valves immediately upon reaching the target. You may need to bleed radiators again if air was introduced during the drainage phase. Always top up the pressure after bleeding to maintain the baseline.
Testing And Verification
Restore power and initiate a heating cycle to verify the expansion vessel functions correctly. The pressure should remain stable as the water heats up. Expect a rise of 0.3 to 0.5 bar. A properly charged vessel accommodates this without the pressure relief valve discharge activating. If the gauge spikes toward 3 bar, the vessel is not working.
Check the PRV discharge pipe outside. It should remain dry throughout the cycle. Monitor the system over the next 48 hours. If the pressure remains within the normal range, the recharge was successful. Document the pre-charge pressure measurement and the date for future reference. Proactive maintenance every 3 to 5 years prevents emergency callouts.
When Recharging Isn't Enough
Sometimes a recharge is only a temporary fix. If water discharges from the Schrader valve core, the ruptured diaphragm means replacement is the only solution. Similarly, if the vessel loses pressure within a few days of servicing, severe diaphragm permeation is likely occurring.
Check for physical damage or severe corrosion on the vessel exterior. In older systems, you might find that while the vessel is fine, you need other boiler spares like a new pressure relief valve if the old one has been stretched by constant venting. Replacement vessels for E-Combi units are cost-effective compared to the damage caused by a failing pressurized system.
Conclusion
Expansion vessel depressurisation and recharging is a fundamental maintenance task that prevents expensive component failure. By following this protocol, you ensure the vessel accommodates thermal expansion properly, which maintains stable system pressure. Proactive servicing extends the life of your boiler and keeps the system running efficiently.
If you find that your boiler continues to lose pressure despite a successful recharge, it is time to investigate further leaks or secondary component faults. For advanced support or specific spare parts, you can contact our technical team to ensure your heating system remains in peak condition.