
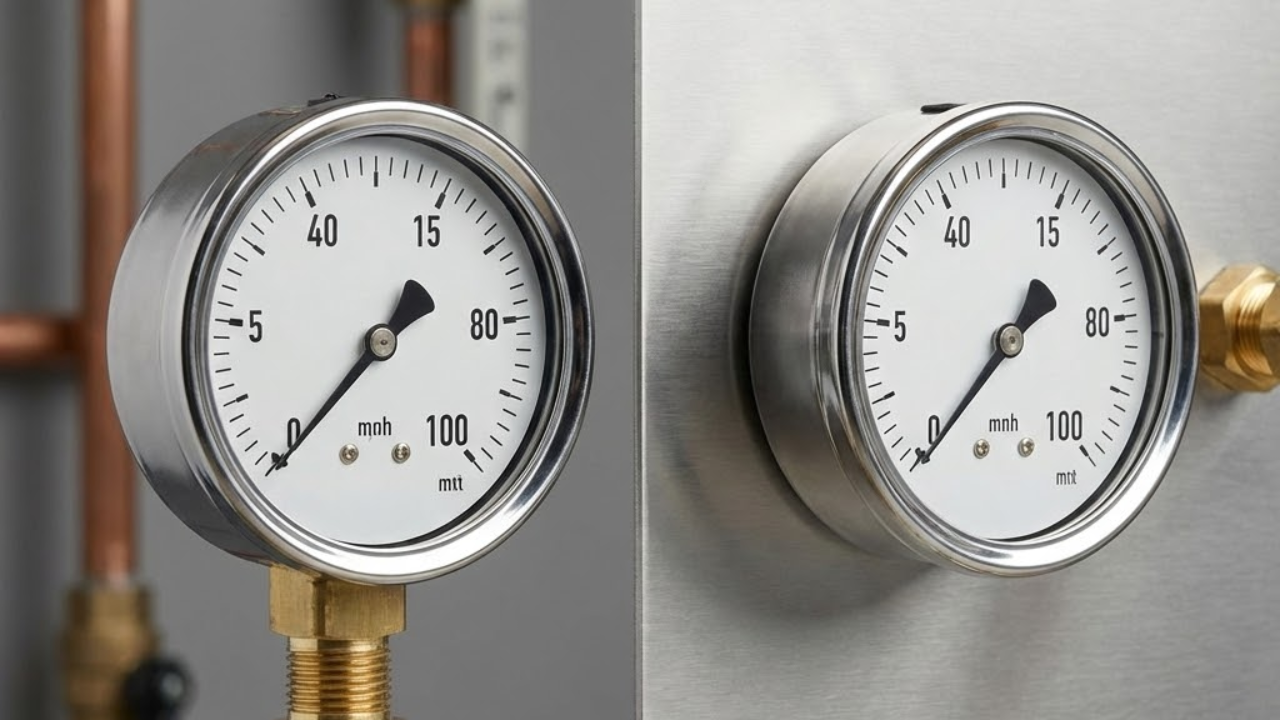
Bottom Connection vs Back Connection Pressure Gauges
Specifying the wrong pressure gauge connection for a heating or plumbing system isn't just a minor oversight. It can mean the difference between a clean, professional installation and one that requires costly rework or limits future serviceability.
Whether you're installing a boiler, sizing a pressurisation unit, or commissioning a commercial hydronic system, understanding the practical implications of bottom connection vs back connection pressure gauges ensures you select the right component for the application, mounting position, and space constraints on site.
Both connection types measure pressure accurately. But their mechanical design, installation requirements, and suitability for different environments vary significantly. Bottom-entry pressure gauges mount the pressure port at the base of the instrument, making them ideal for vertical panel mounting and applications where pipework approaches from below. Back-entry gauge models feature the pressure port at the rear of the case, allowing flush mounting capability against panels, bulkheads, or equipment housings where space is tight or aesthetics matter.
This guide breaks down the key differences between these two gauge configurations. It covers connection mechanics, mounting considerations, typical applications, and selection criteria. By the end, you'll know exactly which style suits your next installation and why getting it right the first time saves time, materials, and callbacks.
Understanding Pressure Gauge Connection Types
Pressure gauges in heating and plumbing systems serve a critical diagnostic function. They provide real-time feedback on system pressure. This helps you confirm correct pressurisation, diagnose faults, and verify that components like expansion vessels, pumps, and pressure relief valves operate within design parameters.
The connection type (bottom or back) determines how the gauge interfaces with the system pipework and where it can be physically mounted.
Bottom-entry pressure gauges feature a threaded port, typically 1/4" BSP or 1/2 BSP thread, located at the centre of the gauge's base. The port sits perpendicular to the dial face. When installed, the gauge sits upright with the dial facing forward, and the pipework or mounting adaptor connects from directly below.
This configuration resembles a traditional pressure gauge you'd see on a boiler front panel or a test manifold. It's the go-to design when you need straightforward mounting and easy access for future replacement.
For comprehensive pressure gauge solutions and instrumentation across all heating applications, Heating and Plumbing World stocks both connection types with expert technical support.
Back-entry gauge models position the threaded port at the rear of the gauge case, parallel to the dial face. The pipework or mounting bracket connects from behind. This allows the gauge to sit flush against a panel or bulkhead. This design is common in tight spaces, such as inside boiler casings, on skid-mounted plant equipment, or where multiple gauges are grouped on a single panel.
Think of it like taps on a sink. A wall-mounted tap is like a bottom connection, projecting forward. A deck-mounted tap is like a back connection, sitting flush with the surface. Same function, different mounting approach.
Both types are available in a range of sizes. 50mm, 63mm, 80mm, and 100mm dial diameters are standard. Pressure ranges include 0-4 bar, 0-10 bar, 0-16 bar, and others. Accuracy classes typically fall into Class 1.6 or Class 2.5 for commercial HVAC work.
The connection type doesn't affect accuracy or pressure rating. It's purely a mechanical and installation consideration.
Bottom Connection Gauges: Design and Applications
Bottom-entry pressure gauges are the default choice for most heating and plumbing installations where the gauge mounts vertically on a panel, bracket, or directly onto a manifold. The design is straightforward. The pressure port threads into a mounting boss, tee, or adaptor, and the gauge stands upright with the dial clearly visible.
Key characteristics include vertical mounting orientation, with the dial face perpendicular to the floor. Pipework approaches from below, making installation easy on horizontal manifolds or vertical panels. The dial faces forward, providing excellent readability for wall-mounted or panel-mounted installations.
Common applications include boiler front panels, test manifolds, pressure test kits, expansion vessel isolation valves, and any application where the gauge mounts on a bracket or directly onto pipework.
Bottom-entry pressure gauges are particularly well-suited to applications where the gauge is exposed and needs to be read from a distance. On a commercial boiler plant room wall, a bottom connection gauge mounted on a 1/2 BSP thread connections allows the engineer to check system pressure at a glance. No bending down or moving equipment required.
For pump installations and circulation systems, Grundfos equipment pairs well with bottom-entry pressure gauges mounted on manifolds for clear pressure monitoring.
One practical advantage is ease of replacement. If a gauge fails or requires recalibration, you simply isolate the system (or close the gauge isolation valve installation), unscrew the old gauge, apply PTFE tape or paste to the threads, and thread in the new one. No need to disturb panel mounting brackets or remove adjacent components.
That's a massive time-saver when you're on a service call and the customer's waiting for heating.
However, bottom-entry pressure gauges do require clearance below the mounting point for the connection itself. If you're retrofitting a gauge to a tight space (inside a boiler casing or onto a crowded manifold) you may find that the protruding connection and pipework interfere with adjacent components. This can make installation awkward.
Back Connection Gauges: Design and Applications
Back-entry gauge models solve the clearance problem by relocating the pressure port to the rear of the gauge case. This allows the gauge to mount flush against a panel, bulkhead, or equipment housing. The pipework or mounting adaptor stays concealed behind.
Key characteristics include flush mounting capability against a flat surface, with the dial face parallel to the panel. Pipework connects from behind, keeping the front face clean and unobstructed. The dial faces forward, but the gauge sits closer to the mounting surface. This makes it ideal for recessed or low-profile installations.
Common applications include boiler front panels (where a clean appearance is required), skid-mounted plant equipment, control panels, and any application where space behind the panel is available but frontal clearance is limited.
Back-entry gauge models are the go-to choice for OEM equipment manufacturers and packaged plant systems, where aesthetics and compactness matter. A modular boiler skid might feature multiple back connection gauges mounted on a single panel. All pipework and connections stay hidden behind the panel for a clean, professional appearance.
For control system integration and temperature regulation components, brands like Danfoss offer compatible instrumentation that pairs well with back-entry gauge installations.
In practice, back-entry gauge installations require a mounting hole drilled through the panel. Typically 10mm or 12mm diameter, depending on the gauge size. The gauge secures using a threaded mounting stud or bracket. The pressure port then connects to a pipe, tube, or flexible hose behind the panel.
This approach works well when the panel is easily removable or when there's sufficient space behind the panel for connections.
One limitation is serviceability. If you need to replace the gauge, you must access the rear of the panel to disconnect the pipework. This potentially requires removing adjacent components or dismantling part of the system. For this reason, back connection gauges are less common in retrofit or field-installed applications, where bottom-entry pressure gauges offer simpler access.
Not long ago, an engineer fitted back connection gauges to a packaged boiler system during initial installation. Looked brilliant. Clean panel, no exposed pipework. Six months later, one gauge failed. Accessing the rear connection meant removing the entire control panel and half the electrical wiring. What should've been a 20-minute gauge swap turned into a three-hour job. That's when you learn to think about serviceability upfront.
Mounting Considerations and Installation Best Practices
Selecting the right connection type isn't just about the gauge itself. It's about the mounting environment, accessibility, and how the gauge integrates with the rest of the system. Here's how to approach the decision on site.
For bottom-entry pressure gauges, ensure adequate clearance below the mounting point for the connection and any pipework or adaptors. Use a gauge isolation valve installation (also called a gauge cock) to allow gauge removal without draining the system. This is non-negotiable.
It's a small needle valve that sits between the gauge and the system. It lets you isolate the gauge for removal or replacement without shutting down the entire heating system. On a commercial installation with 24/7 operation, that capability is worth its weight in gold.
Mount the gauge vertically, with the dial face perpendicular to the floor, for optimal readability. Apply PTFE tape or jointing paste to the threads, taking care not to obstruct the pressure port. Avoid over-tightening. Hand-tight plus one or two turns with a spanner is sufficient for most gauges.
For expansion vessels and pressurisation components requiring gauge isolation valve installation, Altecnic Ltd supplies quality isolation valves compatible with both gauge connection types.
For back connection gauges, confirm that there's sufficient space behind the panel for the pressure port, connection, and any pipework. Drill a mounting hole through the panel, sized to the gauge's mounting stud or bracket. Secure the gauge using the supplied mounting hardware (typically a threaded stud, nut, and washer).
Connect the pipework behind the panel, ensuring the connection is leak-tight and properly supported. Test the installation by pressurising the system and checking for leaks at the gauge connection.
Flush mounting capability looks professional, but it requires planning. Measure the depth behind the panel before you order the gauges. You'll need at least 50-70mm clearance for the connection and any pipe bends.
If you're working with a thin panel or limited rear access, bottom connection might be the smarter choice despite the aesthetics.
In both cases, consider the gauge's pressure range and accuracy class. For most heating and plumbing applications, a 0-4 bar or 0-10 bar gauge with Class 2.5 accuracy (±2.5% of full scale) is sufficient. For critical applications (such as testing pressure relief valves or commissioning pressurisation units) opt for a Class 1.6 gauge (±1.6% of full scale) for tighter tolerances.
One often-overlooked detail is gauge orientation. Bottom-entry pressure gauges are designed to be read from the front, with the dial face perpendicular to the floor. If you mount a bottom connection gauge horizontally (on a vertical pipe run), the dial will be difficult to read. It may not display accurate pressure due to the internal mechanism's orientation.
For horizontal pipe runs, use a back-entry gauge or add a mounting bracket to reorient the gauge vertically.
Typical Applications and Selection Criteria
Choosing between bottom and back connection gauges comes down to the installation environment, mounting constraints, and long-term serviceability. Here's a breakdown of typical applications and the factors that drive the decision.
Bottom-entry pressure gauges are best for boiler test points, where the gauge mounts on a 1/2 BSP thread connections or gauge isolation valve installation. This allows quick connection of a portable gauge for commissioning or diagnostics. They're also ideal for expansion vessel isolation valves, where the gauge mounts directly onto the valve body, providing permanent pressure monitoring.
Manifold installations benefit from bottom-entry pressure gauges mounted on horizontal manifolds or headers, with pipework approaching from below. Retrofit applications use them when the gauge is added to an existing system and needs to be easily accessible for maintenance or replacement.
Field installations favour bottom connection gauges when the installer has limited access to the rear of the mounting surface and needs a straightforward, front-accessible connection.
Back connection gauges are best for OEM equipment panels, where the gauge is part of a packaged system and aesthetics matter. Skid-mounted plant installations use them when multiple gauges are grouped on a single panel, with all pipework concealed behind.
Tight spaces benefit from back connection gauges where frontal clearance is limited but there's room behind the panel for connections. Control panels use them when the gauge is part of a larger control or monitoring system, with all connections routed behind the panel.
Applications requiring a clean appearance choose back connection gauges where exposed pipework or connections would detract from the installation's professional look.
In some cases, the choice is dictated by the mounting hardware or equipment you're working with. Many boiler manufacturers specify back connection gauges for their front panels, with pre-drilled mounting holes and rear pipework connections. In these cases, using a bottom connection gauge would require custom fabrication or adapters. This adds cost and complexity.
Conversely, if you're installing a gauge on a test manifold or portable pressure test kit, a bottom connection gauge is the obvious choice. It's quicker to install, easier to replace, and doesn't require access to the rear of the mounting surface.
Practical Considerations for Heating and Plumbing Professionals
Beyond the mechanical differences, there are a few practical considerations that can influence your choice of gauge connection type. These affect how you specify, install, and maintain pressure gauges on site.
Always install pressure gauges with a gauge isolation valve installation to allow removal without draining the system. This is particularly important for bottom-entry pressure gauges, where the gauge threads directly into the pipework. A gauge cock also protects the gauge from pressure spikes and water hammer. This extends its service life.
Most pressure gauges in the UK use BSP (British Standard Pipe) threads. Typically 1/4" BSP for smaller gauges (50mm and 63mm dials) and 1/2 BSP thread for larger gauges (80mm and 100mm dials). Always verify thread size and type before ordering. Use the correct jointing method: PTFE tape for metal-to-metal joints, jointing paste for tapered threads.
For control systems and valve assemblies requiring precise pressure monitoring, manufacturers like Honeywell offer compatible instrumentation that integrates with both gauge connection types.
Specify a gauge with a pressure range that covers the system's normal operating pressure plus a safety margin. If your system operates at 1.5 bar, a 0-4 bar gauge provides adequate range and resolution. Avoid over-specifying the pressure range. A 0-16 bar gauge will be less accurate at low pressures than a 0-4 bar gauge.
Pressure gauges are mechanical instruments. They're vulnerable to damage from over-pressurisation, vibration, and thermal cycling. In high-vibration environments (near pumps or compressors), consider using a liquid-filled gauge (typically filled with glycerine) to dampen vibration. This extends the gauge's service life.
For high-temperature applications (near boilers or heat exchangers), use a gauge with a syphon or pigtail to isolate the gauge from direct contact with hot media.
Plan for future maintenance when specifying gauge connection type. If the gauge is difficult to access (inside a boiler casing or behind a fixed panel), consider using a back-entry gauge with a quick-disconnect fitting or flexible hose. This simplifies replacement.
For field-installed gauges, bottom-entry pressure gauges with gauge cocks offer the easiest access for routine maintenance.
Real-World Scenario: Choosing the Right Gauge for a Commercial Boiler Installation
Here's a scenario that illustrates the practical difference between bottom and back connection gauges. You're commissioning a new commercial gas boiler in a plant room. You need to install permanent pressure gauges on the flow and return manifolds. The manifolds are mounted horizontally on the wall, about 1.5 metres above the floor, with limited clearance to the ceiling.
For the flow manifold, you install a bottom connection gauge on a 1/2 BSP thread connections, with a gauge cock for isolation. The gauge sits upright, with the dial facing forward, and the connection is easily accessible from the front. You can read the pressure at a glance. If the gauge needs replacing in future, you simply close the gauge cock, unscrew the old gauge, and thread in a new one.
No need to drain the system or disturb adjacent pipework. Job done in ten minutes.
For the return manifold, however, space is tighter. The manifold is close to the ceiling. There's a cable tray directly above it, leaving minimal clearance for a bottom connection gauge and its associated pipework.
Instead, you opt for a back-entry gauge, mounted on a bracket behind the manifold using a mounting stud. The pressure port connects to a short length of copper tube, which runs behind the manifold and connects to a tee on the return pipe.
The gauge sits flush against the bracket, with the dial clearly visible from the front. The connection is concealed behind the manifold. This approach saves space, avoids interference with the cable tray, and delivers a clean, professional installation.
The trade-off? If the gauge fails, you'll need to access the rear of the manifold to disconnect the copper tube. But given the gauge's robust construction and the controlled environment of the plant room, that's unlikely to be an issue for years.
Comparing Bottom and Back Connection Gauges: A Summary
To summarise the key differences and help you make an informed decision, here's a side-by-side comparison:
Bottom-entry pressure gauges feature pressure port located at the base of the gauge, perpendicular to the dial face. They're designed for vertical mounting on panels, brackets, or directly onto pipework. Pipework approaches from below, requiring clearance beneath the mounting point.
They're easy to install and replace. Simply unscrew the old gauge and thread in a new one. They're ideal for field installations, retrofit applications, and test manifolds. Best when frontal access is available and rear access is limited.
Back connection gauges feature pressure port located at the rear of the gauge case, parallel to the dial face. They're designed for flush mounting capability against panels, bulkheads, or equipment housings. Pipework connects from behind, keeping the front face clean and unobstructed.
They require access to the rear of the panel for installation and maintenance. They're ideal for OEM equipment, skid-mounted plant, and applications where aesthetics matter. Best when space behind the panel is available and a low-profile installation is required.
Both connection types deliver accurate pressure measurement. Both are available in a range of sizes, pressure ranges, and accuracy classes. The choice comes down to the installation environment, mounting constraints, and how you prioritise accessibility versus aesthetics.
Sourcing Quality Pressure Gauges for Heating and Plumbing Systems
When specifying pressure gauges for heating and plumbing installations, quality matters. A poorly constructed gauge can fail prematurely, deliver inaccurate readings, or leak at the connection. This leads to callbacks, system downtime, and frustrated clients.
At Heating and Plumbing World, you'll find a comprehensive range of pressure gauges from trusted manufacturers. This includes both bottom and back connection configurations. Whether you're commissioning a commercial boiler, installing a pressurisation unit, or assembling a test manifold, you'll find gauges that meet industry standards for accuracy, durability, and reliability.
For general enquiries about gauge selection, technical specifications, or bulk orders for commercial projects, our team will help you identify the right gauge for your application.
Conclusion
Selecting between bottom-entry pressure gauges and back-entry gauge models isn't a matter of one being universally better than the other. It's about matching the gauge's mechanical design to the installation environment, mounting constraints, and serviceability requirements.
Bottom-entry pressure gauges excel in field installations, retrofit applications, and anywhere frontal access is prioritised. They're straightforward to install, easy to replace, and ideal for test manifolds, boiler test points, and expansion vessel monitoring.
Back-entry gauge models, on the other hand, deliver a clean, low-profile installation where space is tight, aesthetics matter, or pipework needs to be concealed behind panels. They're the standard choice for OEM equipment, skid-mounted plant, and control panels where multiple gauges are grouped together.
By understanding the practical differences (connection mechanics, mounting orientation, pipework approach, and long-term serviceability) you can specify the right gauge for each application. This avoids costly rework and ensures your installations meet professional standards.
Whether you're commissioning a commercial boiler, sizing a pressurisation unit, or troubleshooting a hydraulic imbalance, the right pressure gauge provides the real-time feedback you need. It helps you diagnose faults, verify system performance, and deliver reliable, efficient heating and plumbing systems.
Proper gauge isolation valve installation, accurate 1/2 BSP thread connections specification, strategic flush mounting capability deployment, and careful consideration of back-entry gauge serviceability requirements separate professional pressure gauge installations from rushed jobs.
For technical guidance on pressure gauge selection or to discuss your specific installation requirements, contact us for expert support tailored to your project needs.