
How to Repressurise Your Heating System in 5 Minutes
Low boiler pressure is one of those faults that catches homeowners off guard. One day the heating is working fine, and the next morning the radiators are stone cold. The pressure gauge sits stubbornly below 1 bar, and panic sets in. However, the reality is that repressurising a heating system is one of the simplest maintenance tasks you will ever perform, and it doesn't require an engineer callout.
Most modern sealed heating systems lose pressure gradually over time. It isn't always a sign of a serious leak. Sometimes it's just the natural expansion and contraction of water as the system heats and cools. A slow pressure drop of 0.1-0.2 bar over several months is perfectly normal. If you drop below 0.5 bar, your boiler will likely lock out as a safety precaution.
The good news is that you can restore pressure in about five minutes using the filling loop. This guide walks you through the process step-by-step, explains why pressure matters, and helps you spot when a pressure drop signals something more serious.
Why Boiler Pressure Matters
Your heating system is a sealed circuit. Water circulates through the boiler, pipework, and radiators under pressure, typically between 1.0 and 1.5 bar when cold. This pressure is essential for efficient heat transfer and prevents air from entering the system. Many modern water heating systems simply will not fire up if the pressure falls below the safety threshold.
Think of your system's pressure like the tyres on your van. Too little pressure and performance suffers dramatically. Too much pressure and you risk damaging components or causing a blowout. The sweet spot sits right in the middle, ensuring smooth, efficient operation.
When pressure drops too low, the boiler's safety mechanisms kick in. Without adequate pressure, water can't circulate properly, and components like the heat exchanger risk overheating. On the flip side, excessive pressure forces the pressure relief valve to discharge water. You'll notice this as dripping from an external overflow pipe. It's a safety feature, not a fault, but it does mean you've overfilled the system.
What You Will Need
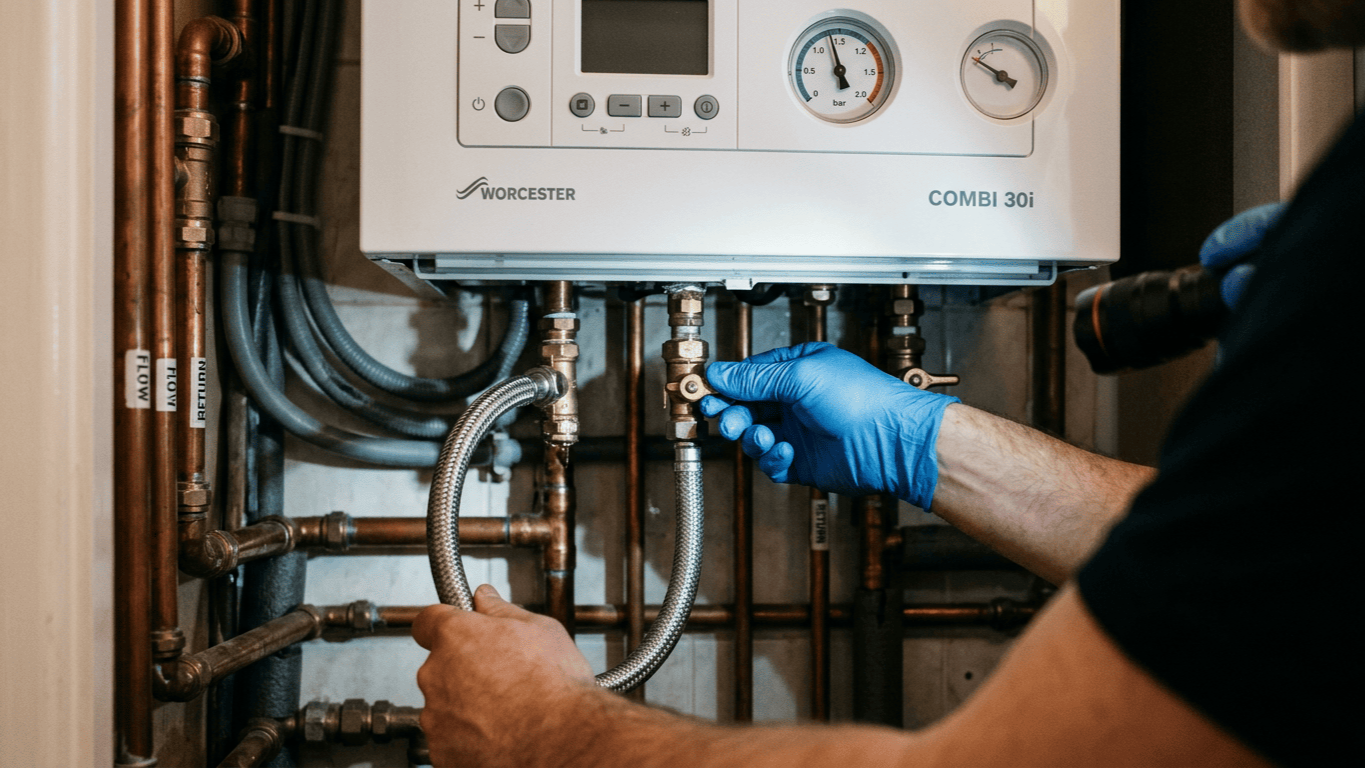
Before you start repressurising a heating system, gather a towel or cloth because filling loops can drip slightly when disconnected. You will also need a torch if your boiler is tucked away in a dark cupboard, your boiler manual to confirm the correct operating pressure, and a key or screwdriver for specific valve types.
Most importantly, locate your filling loop. This connects your heating system to the cold water supply and is usually found directly beneath the boiler. On many modern combination boilers, it is almost always within arm's reach of the unit itself.
It will be one of two types. You might find a braided hose, which is a flexible silver or black line with a valve at each end. Alternatively, you might have an internal rigid loop with a removable key. If you can't find it, check the manual or look near the main pipework entering the boiler.
Step-by-Step: Repressurising Your Heating System
Here is how to safely restore pressure to your system. The entire process takes less than five minutes once you know what you're doing.
Step 1: Switch off the boiler Turn the boiler off at the control panel or programmer. You don't need to isolate the power supply, just make sure the boiler isn't actively firing. This prevents the pump from running while you're adding water and gives you an accurate pressure reading. Wait a few minutes if the system has been running recently.
Step 2: Check the current pressure Look at the pressure gauge on the front of the boiler. It is usually a circular dial with a needle or a digital display on newer models. The gauge will have coloured zones indicating the safe operating limits. If the needle is sitting in the lower red zone or hovering around 0.5 bar, you need to add water.
Step 3: Locate and prepare the filling loop Find the filling loop beneath the boiler. If you are using an external braided hose, check both ends are securely attached to the valves. One connects to the heating circuit, and the other to the mains water supply. If you have a combi boiler with an internal keyed loop, insert the key firmly into the slot. Place a towel beneath the connection to catch any stray drips.
Step 4: Open the valves slowly This is the critical bit. You are about to introduce mains water into a system that is currently well below 1 bar. Turn the first valve slowly anticlockwise until you hear water flowing, then open the second valve gradually. Keep your eyes on the pressure gauge, not the valve. The needle will rise steadily. Your target is 1.0 to 1.2 bar when cold. As soon as the needle reaches this point, close the valves immediately.
Step 5: Close the valves and remove the key Once you have hit the target pressure, close both valves firmly by turning them clockwise. Leaving the valves open creates a permanent connection between your heating system and the mains supply, which is a serious cross-contamination risk. At Heating and Plumbing World, we always advise disconnecting the loop completely if regulations require it.
Step 6: Bleed radiators if necessary Adding water to the system can introduce small amounts of air. If you notice any radiators are cold at the top but warm at the bottom, bleed them using a radiator key. Releasing air will cause a small pressure drop. If you have dropped back below 1 bar, repeat the filling process.
When to Call an Engineer
Repressurising is routine maintenance, but repeated pressure loss signals an underlying issue. On a recent residential job, a homeowner had been topping up their system every three days for a month. When I arrived, the issue wasn't the filling loop at all. It was a failed expansion vessel that had completely lost its charge. It was causing the pressure relief valve to continuously dump water outside, creating a massive hidden leak.
If you are topping up more than once every few months, you've got a leak somewhere. It might be a weeping valve, a corroded pipe joint, or a failed seal. Small leaks are easy to miss because the water evaporates before you notice puddles.
If the gauge climbs rapidly into the red zone when the heating is on, your expansion vessel has likely lost its air charge. The vessel absorbs the increased volume as water heats up. When it fails, pressure spikes and forces water out through the external overflow pipe.
Visible leaks pooling beneath the boiler or damp patches on walls need immediate attention. Even a slow drip can cause significant structural damage over time.
Understanding Your Heating System's Pressure
Modern sealed systems differ fundamentally from older open-vented setups. If you have a header tank in the loft feeding your heating system, you don't have a sealed system and this guide doesn't apply. Those systems rely on gravity, not pressure, to circulate water.
Sealed systems, including the vast majority of combination boilers installed today, became standard in the UK from the 1980s onwards. They are more efficient, take up less space, and don't require loft tanks.
They do need occasional topping up because micro-leaks can release water over weeks, thermal expansion stresses joints, and water naturally absorbs tiny amounts of air. Every time you bleed the system or adjust your radiator valves, you also lose a small amount of water. Quality components are engineered to maintain seal integrity over decades, reducing the frequency of pressure-related issues.
Preventing Pressure Problems
A few proactive steps keep your system running smoothly and prevent unexpected lockouts. Have a Gas Safe engineer inspect the boiler annually, check for leaks, and test the expansion vessel charge. Prevention is always cheaper than reactive repairs.
Ensure your system contains corrosion inhibitor. This chemical prevents internal corrosion that can weaken joints and cause leaks. It should be topped up whenever the system is drained.
If your system suffers from persistent pump problems or blockages, the resulting hydraulic stress can also cause micro-leaks around fittings. If your external braided hose is old, rigid, or corroded, replace it. It's an inexpensive part that prevents bigger headaches when you desperately need to top up the system.
Common Mistakes to Avoid
Even straightforward tasks have pitfalls. Overfilling is the most common error. If you accidentally push the pressure above 2 bar, don't panic. Let the system cool completely, then bleed a radiator slightly to release water. Check that the pressure drops back to 1-1.5 bar.
Forgetting to close the filling loop valves can cause the pressure to climb dangerously high. Always close both valves and remove the key to prevent mains water from continuously breaching the external overflow pipe.
If you are adding water every week, you are masking a leak. Stop topping up and call an engineer to trace the problem before you need expensive boiler replacement parts. Continuing to use a compromised system risks damaging the heat exchanger.
Conclusion
The act of repressurising a heating system is a five-minute job that every homeowner should feel confident tackling. Low pressure is almost always a simple fix. You open the filling loop valves, watch the gauge climb to 1-1.2 bar, and close them again. It is routine maintenance, not an emergency.
But context matters. If you're topping up frequently, the real issue isn't pressure, it's the leak causing the pressure drop. That's when you need an engineer to trace pipework, test joints, and check components safely. For trade professionals, understanding these basics helps when advising customers or diagnosing faults remotely.
Keep a towel handy, watch that gauge carefully, and remember that if in doubt, close the valves and step back. It's far easier to add a bit more pressure than to deal with an overfilled system. If you need technical advice on system maintenance, please speak to our team for expert guidance tailored to your specific setup.