
Kingspan Pre-Plumbed AUI120P4ERP: Single Zone Package Installation Guide
Installing a heat pump system shouldn't feel like decoding a space shuttle manual. But if you have ever stared at a technical specification sheet and wondered where to even start, you aren't alone.
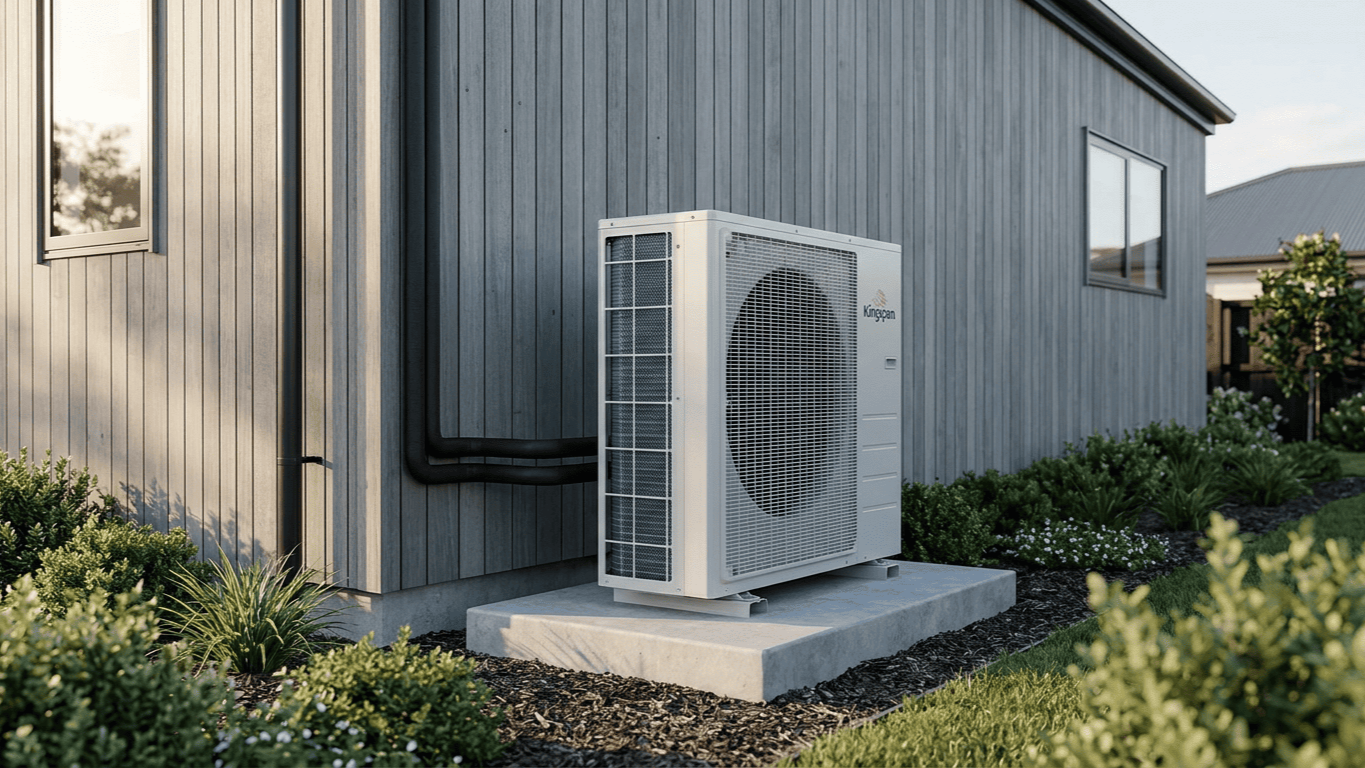
The Kingspan pre-plumbed AUI120P4ERP is designed to simplify the installation process for single-zone applications. It arrives with most of the hard work already done, featuring pre-charged refrigerant lines, factory-tested connections, and a modular design that cuts installation time significantly. But pre-plumbed doesn't mean plug-and-play. You will still need to understand the system's requirements, prepare the site properly, and follow a logical sequence to avoid the kind of mistakes that cost you time and callbacks.
Years of reviewing field installations reveal a consistent pattern. Installers frequently rush through the preparatory work, skip crucial checks, or misunderstand the electrical requirements. The result involves systems that underperform, leak, or fail prematurely. This guide walks through the entire installation process, from site assessment to final commissioning, written precisely for HVAC professionals who want to get it right the first time.
Understanding The AUI120P4ERP System Components
The single-zone package includes an outdoor condensing unit, an indoor air handler, pre-charged refrigerant lines, and a control system. Each component plays a specific role, and understanding how they work together prevents critical installation errors. Matching these components correctly is just as important as selecting the appropriate hot water cylinder for domestic storage.
The outdoor condensing unit houses the compressor, condenser coil, and expansion valve. It's built to withstand harsh weather conditions, but it still requires proper placement away from direct sunlight where possible, with adequate airflow clearance. Restricted airflow forces the compressor to work far harder than it should.
The indoor air handler connects to your ductwork and distributes conditioned air throughout the zone. It's factory-matched to the outdoor condensing unit, which means you don't need to worry about refrigerant compatibility or tonnage mismatches.
The pre-charged refrigerant lines are the real time-saver here. Traditional split systems require you to run copper lines, braze connections, and vacuum the system before charging. With the Kingspan pre-plumbed AUI120P4ERP, the lines come pre-insulated and charged. You simply connect them at both ends, check for leaks, and you're done. It is that simple.
Site Assessment And Preparation Requirements
Before you unload the equipment, walk the site and verify every critical dimension. Measure twice, install once. Heating and Plumbing World supplies robust mounting hardware to ensure the equipment remains level and secure for its entire lifespan.
Start with the unit location. You need a level concrete pad or mounting bracket that can support the unit's weight, which is approximately 85kg for this model. The pad should extend at least 50mm beyond the unit's footprint on all sides.
Clearance matters more than most installers realise. The manufacturer specifies minimum clearances for a reason. They're based on rigorous airflow calculations and heat rejection requirements.
On a recent commercial retrofit, an inexperienced installer squeezed an outdoor condensing unit into a tight courtyard with barely 200mm clearance on three sides. The client complained about high energy bills within the first month. The unit was working overtime trying to pull in enough air, highlighting exactly why clearance specifications are non-negotiable. For the Kingspan pre-plumbed AUI120P4ERP, you need a 500mm minimum on the service side, a 300mm minimum on the sides and rear, and a 1500mm minimum above the unit for vertical airflow.
Electrical Connection And Safety Protocols
Electrical work on HVAC systems must strictly comply with local wiring standards and safety regulations. The outdoor unit requires a dedicated circuit breaker sized according to the manufacturer's specifications. The cable must be rated for outdoor use and protected in conduit where exposed to physical damage.
Connect the active, neutral, and earth wires to their designated terminals. Tighten each connection firmly, then give each wire a gentle tug to confirm it's secure. Loose connections create resistance, which generates heat and eventually leads to failure.
The control wiring between the indoor and outdoor units carries low-voltage signals. Modern setups often integrate this wiring with a smart temperature control system for maximum efficiency. These wires are typically colour-coded and clearly labelled in the installation manual. A single crossed wire can prevent the system from operating or cause erratic behaviour.
Refrigerant Line Installation And Leak Testing
The pre-charged lines are one of the biggest advantages, but they still require careful handling. Kink a line or contaminate the refrigerant, and you've just turned a quick install into a lengthy repair job.
The refrigerant lines come in matched pairs, insulated and capped at the ends. Keep those caps on until you're ready to make the final connection. Route the lines from the outdoor unit to the indoor air handler along the most direct path that avoids sharp bends. Never substitute these highly specialised connections with a standard water push fit joint, as the pressure requirements are completely different.
When you're ready to connect, inspect the refrigerant flare fitting surfaces. They should be clean, smooth, and free from scratches or deformation. Apply a thin layer of refrigerant oil to the surfaces. This helps create a better seal and prevents galling when you tighten the connections. Thread the refrigerant flare fitting nuts on by hand first. Once the nut is hand-tight, use a torque wrench to tighten to the manufacturer's specification.
After both ends are connected, it's time for leak testing. Use a dedicated electronic leak detector or nitrogen pressure test. Apply leak detection solution to every connection point and watch for bubbles, or sweep the area slowly with your electronic leak detector to ensure absolute system integrity.
Ductwork Integration And Airflow Optimisation
The indoor air handler won't perform properly if the ductwork is undersized, leaky, or poorly designed. Start by verifying the existing ductwork matches the system's airflow requirements. If the ducts are too small, you'll create excessive static pressure that reduces efficiency and increases noise.
Seal every duct joint with approved mastic sealant. Connect the supply and return ducts to the air handler using insulated flexible duct or sheet metal transitions wrapped in high-quality pipework insulation. Avoid sharp bends or crimped sections that restrict airflow. Each 90-degree elbow in your ductwork costs you approximately 10% of your airflow capacity.
Install the air filter according to the manufacturer's specifications. Check the condensate drain line next. The drain line should slope continuously downward at a minimum gradient. Install a trap if the system requires one, as it prevents air from being drawn into the drain line and affecting system performance.
System Commissioning And Performance Verification
You've made all the connections, checked for leaks using an electronic leak detector, and verified the electrical work. Now comes the moment of truth. Energise the outdoor unit and listen for unusual sounds. The compressor should start smoothly without excessive vibration or grinding noises.
Set the thermostat to cooling mode and lower the setpoint below the current room temperature. Air should begin flowing from the supply registers, and you should feel the temperature drop. Much like balancing traditional heating pumps, verifying the flow and temperature output is critical. Measure the supply air temperature at the nearest register and the return air temperature at the return grille. The difference should be approximately 10°C to 12°C in cooling mode.
Check the refrigerant pressures using manifold gauges connected to the service ports. Compare your readings to the manufacturer's pressure chart for the current outdoor temperature. Verify the electrical current draw on both the outdoor and indoor units against the nameplate specifications.
Troubleshooting Common Installation Issues
Even experienced installers encounter problems. If the Kingspan pre-plumbed AUI120P4ERP won't start at all, check the obvious things first. Verify power at the disconnect, confirm the thermostat is calling for demand, and check for tripped breakers.
Short cycling usually indicates a refrigerant problem, dirty filters, or blocked airflow. Check the air filter first. If the system runs but doesn't cool effectively, measure your temperature split and refrigerant pressures. Low suction pressure combined with a small temperature split points to insufficient airflow. High suction pressure with a small temperature split suggests refrigerant overcharge.
Unusual noises require immediate attention. Squealing typically indicates a bad bearing in a fan motor. Modern heating controls will often display diagnostic codes to assist you, but grinding or rattling suggests loose mechanical components that require manual inspection.
Maintenance Recommendations For Long-Term Performance
Installation is just the beginning. Schedule the first service visit at three to six months after installation. Check refrigerant pressures, verify electrical connections remain tight, and inspect for any signs of wear or deterioration.
Clean or replace the air filter every one to three months depending on usage. Think of a dirty air filter like trying to breathe through a thick wool blanket. Eventually, the system's airflow is completely choked, forcing the motor to work harder until something simply gives out.
Inspect the outdoor condensing unit quarterly. Clear away leaves, grass clippings, and debris that accumulate around the unit. Check that the condenser coil isn't blocked by vegetation or dirt buildup. A clean coil rejects heat efficiently, whilst a dirty one forces the compressor to work overtime.
Conclusion
The Kingspan pre-plumbed AUI120P4ERP simplifies single-zone heat pump installation, but it still demands attention to detail and adherence to proper procedures. From site assessment through commissioning, each step builds on the previous one. Skip the preparation work or rush the electrical connections, and you'll pay for it in callbacks.
The pre-charged refrigerant lines and factory-matched components eliminate many of the variables that complicate traditional split system installations. Take the time to verify every refrigerant flare fitting, measure every critical dimension, and test every system function. The extra hour you spend during installation prevents the service calls you'll avoid later. If you are unsure about duct sizing or electrical specifications, reach out to our experts to guarantee your installation goes smoothly from start to finish.