
Radiator Hanging Brackets: Wall Fixing Solutions
Getting a radiator to sit flush against a wall sounds straightforward until you're staring at a wonky installation that's dripping water onto your newly laid flooring. The difference between a secure, level radiator and one that becomes a maintenance headache often comes down to choosing the right radiator hanging brackets and fitting them properly.
Radiator brackets handle more stress than most people realise. A standard double-panel radiator filled with water can weigh upwards of 50kg, and that weight hangs entirely on two to four small fixing points. Add in the thermal expansion and contraction that happens with every heating cycle, plus the occasional knock from furniture or hoovering, and you start to understand why proper wall fixings matter.
What Makes a Quality Radiator Bracket
Not all brackets look different, but their performance varies wildly. The basic job stays the same: hold a radiator securely to a wall, but how they achieve this separates adequate from excellent.
Material Composition
Material composition determines longevity. Steel brackets with proper corrosion-resistant coatings outlast cheaper alternatives by years. Myson radiator parts include heavy-duty brackets designed to handle the weight of modern panel radiators without bending or warping over time.
Load Capacity
Load capacity varies between bracket types. Standard brackets suit radiators up to 1200mm wide; for larger installations, heavy-duty versions are available. Column radiators, which concentrate weight differently than panel types, often require specialist brackets that distribute load across more fixing points.
Adjustability
Adjustability proves essential during radiator bracket installation. Brackets with slotted holes or multiple fixing positions let you compensate for walls that aren't perfectly plumb. This flexibility saves hours of frustration when working with older properties where walls have settled or shifted.
Hook Design
The hook design matters more than you'd think. Sharp, well-defined hooks prevent radiators from lifting off during thermal expansion. Rounded or poorly formed hooks let radiators shift position, creating leaks at valve connections and uneven heating distribution.
Matching Brackets to Wall Types
Your wall construction dictates which fixings work and which fail catastrophically. Get this wrong and you're looking at a radiator on the floor surrounded by water damage.
Solid Masonry Walls
Solid masonry walls, brick, concrete block, or dense stone, accept standard fixings well. Red plastic wall plugs with appropriate screws work for lighter radiators up to 30kg. Heavier installations need brown or blue plugs rated for higher loads. The key lies in drilling the right diameter hole at the correct depth. Too shallow, and the plug won't expand properly. Too wide and it spins uselessly.
Cavity Walls
Cavity walls present challenges because the inner leaf, where you're actually fixing, might be lightweight block or even aerated concrete. Standard plugs often fail in these materials. Resin anchors or frame fixings that grip behind the plasterboard provide more reliable support. Installations have been seen where installers used plasterboard fixings alone, which works until it doesn't, usually at 3 am when the heating kicks on.
Plasterboard Partition Walls
Plasterboard partition walls require specialist approaches. Cavity fixings like spring toggles or metal cavity anchors spread the load across larger areas of the board. Even then, you're limited to lighter radiators, typically nothing over 20kg when filled. For heavier radiators on stud walls, you need to locate the timber studs and fix directly into them using wood screws.
Lath and Plaster
Lath and plaster in older properties creates unique problems. The plaster sits on thin wooden strips with voids behind. You need to penetrate through to the solid masonry behind, using longer fixings that reach past the lath structure. Drilling requires care because aggressive drilling shatters the plaster, creating repair work before you've even hung the radiator.
Installation Spacing and Positioning
Where you position the radiator hanging brackets affects radiator performance and longevity. Too far apart and the radiator sags in the middle, stressing the panel seams. Too close together, and you waste fixings without gaining security.
Standard Spacing
Standard panel radiators need brackets positioned 100-150mm from each end. This placement supports the radiator's weight distribution while leaving room for valve connections. For radiators over 1200mm wide, add a centre bracket to prevent sagging. The weight of water-filled panels creates substantial downward force on the middle section, and without support, even quality radiators develop stress fractures over time.
Height Positioning
Height positioning requires measuring from the finished floor level, not the subfloor if you're mid-renovation. Most installations place the bottom of the radiator 100-150mm above floor level. This clearance allows air circulation underneath while keeping the radiator high enough for easy cleaning. Too low and you restrict airflow, reducing heating efficiency. Too high and you waste wall space during making bleeding and maintenance awkward.
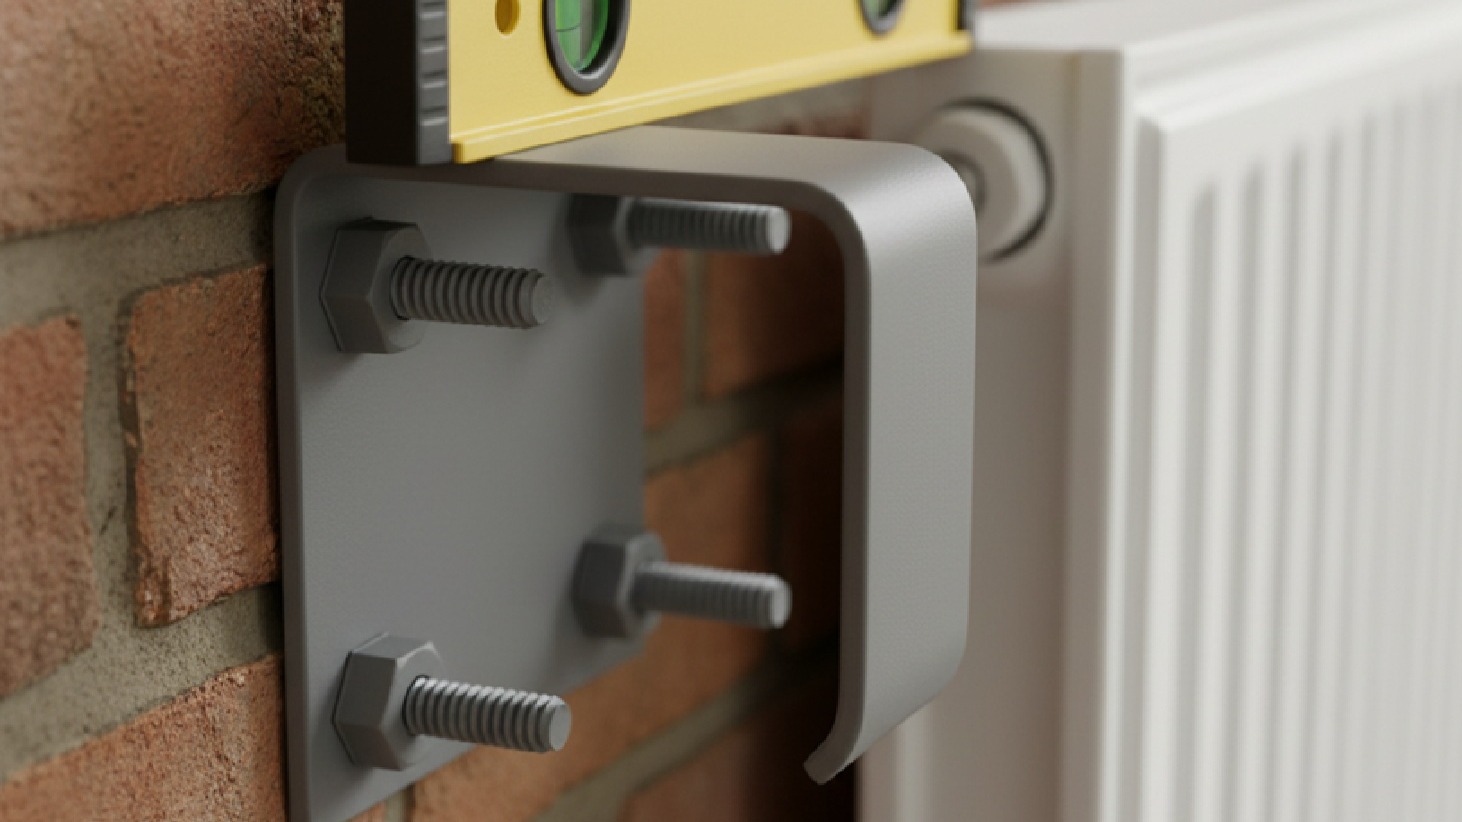
Level Alignment
The brackets themselves need to sit level with each other, obvious but frequently botched. A radiator hanging at an angle won't heat evenly because air gets trapped on the higher side. Water circulation becomes restricted, creating cold spots and reducing output. Use a spirit level across both bracket positions before drilling. Mark your fixing points with a sharp pencil, then double-check measurements before committing to drilling.
Common Fixing Failures and Prevention
Radiator bracket installation failures happen in predictable ways, and understanding these patterns prevents problems before they start.
Insufficient Wall Plug Depth
Insufficient wall plug depth tops the failure list. Installers drill shallow holes because they're rushing or worried about hitting cables. The plug sits proud of the wall surface, and when you tighten the screw, it pulls out rather than expanding into the masonry. The fix seems secure initially, but thermal cycling gradually loosens it until the radiator drops.
Wrong Component Combinations
Wrong plug and screw combinations cause problems. Using a 5mm plug with an 8mm screw sounds obviously wrong, yet it happens regularly. The screw splits the plug rather than expanding it, creating zero grip. Match plug and screw sizes according to manufacturer specifications. If you're using Danfoss heating components, check their installation guidelines for recommended fixing specifications.
Over-Tightening
Over-tightening damages wall materials and brackets. Tightening screws until the bracket bends or the wall crumbles doesn't create a stronger fixing; it destroys one. Tighten until the bracket sits firmly against the wall with no movement, then stop. The bracket should hold the radiator's weight through proper engagement with the wall material, not through brute force on the screw thread.
Incorrect Orientation
Incorrect bracket orientation happens more often than you'd expect. Some brackets have a specific top and bottom, with the hook angle designed to hold the radiator at a particular pitch. Fit them upside down, and the radiator either won't hang properly or sits at the wrong angle for proper bleeding and drainage.
Specialist Bracket Solutions
Standard brackets handle most situations, but certain installations need specific solutions for proper radiator bracket installation.
Floor-Standing Brackets
Floor-standing brackets suit situations where wall fixing proves impossible or insufficient. These brackets support the radiator's weight from below, and wall brackets provide stability. You'll find them in conservatories with glass walls, rooms with cavity walls that can't support weight, or installations with particularly heavy cast-iron radiators.
Adjustable Projection Brackets
Adjustable projection brackets let you position radiators further from walls when pipework or wall irregularities create problems. These brackets extend 50-100mm beyond standard versions, creating space for awkward pipe runs or allowing radiators to clear skirting boards without notching.
Column Radiator Brackets
Column radiators need brackets designed for their unique weight distribution. These typically feature wider mounting plates and multiple hook positions to distribute load across several columns rather than concentrating stress on just two points.
Concealed Brackets
Concealed brackets hide behind designer radiators where visible fixings would spoil aesthetics. These brackets often incorporate adjustment mechanisms that let you fine-tune radiator position after initial installation.
Quality pipe fittings and connections ensure proper valve alignment with radiators hung on correctly positioned brackets.
Maintenance and Inspection
Once installed, radiator hanging brackets need occasional attention to maintain security and prevent failures.
Annual Checks
Annual checks should include visual inspection of bracket condition and testing for movement. Grasp the radiator firmly and try to lift it from the brackets. Any movement indicates loosening fixings that need attention. Check for rust on steel brackets, particularly in bathrooms or kitchens where humidity stays high. Surface rust can be wire-brushed and painted, but deep corrosion means replacement.
After System Work
After heating system work, check bracket security. Draining and refilling systems, or working on Grundfos heating pumps that change system pressure, can stress brackets and fixings. The change in weight as water drains and refills sometimes reveals marginal fixings that were barely adequate.
Following Leaks
Following leaks, inspect brackets for water damage. Water running down walls deteriorates fixings, particularly in plasterboard or materials that soften when wet. Even after repairing the leak source, the wall material around the fixings might have lost strength. If you've dealt with leaks around radiator valves or connections, check that water hasn't tracked behind the radiator to the bracket fixings.
Upgrading Existing Installations
Replacing radiators often means addressing inadequate bracket installations from previous work.
Assessing Existing Fixings
Assessing existing fixings before hanging a new radiator prevents problems. Remove the old radiator and test existing brackets for security. If they move at all, replace them. Check the wall condition around old fixing points; years of thermal cycling sometimes create cracks or weakness in the surrounding material.
Repositioning
Repositioning might be necessary if the new radiator has different bracket spacing or if you're upgrading to a larger, heavier model. Fill old fixing holes properly with mortar or filler appropriate to the wall type before drilling new positions. Leaving old holes unfilled creates weak points where new cracks can develop.
Weight Considerations
Weight considerations matter when upgrading from single to double panel radiators or moving to higher-output models. That old single-panel radiator might have weighed 15kg filled, while the new double-panel convector replacement weighs 45kg. The existing brackets and fixings might not cope with the increased load. When upgrading heating systems with components from suppliers like Andrews heating solutions, ensure your wall fixings match the new equipment specifications.
Professional Installation Standards
Understanding what proper radiator bracket installation looks like helps determine whether you're doing the work yourself or checking someone else's efforts.
Bracket Alignment
Bracket alignment should be perfect across both horizontal and vertical planes. Use a long spirit level to check that both brackets sit at exactly the same height. Even a 2-3mm difference creates an angled radiator that won't heat properly and looks unprofessional.
Appropriate Fixings
Appropriate fixings for the wall type and radiator weight show attention to detail. Installers who use the same fixing approach regardless of wall type or radiator size either don't understand the engineering involved or don't care about long-term performance.
Clean Installation
Clean installation includes proper hole sizing, neat drilling without excessive wall damage, and appropriate filler around fixings if needed. Holes shouldn't be oversized, and there shouldn't be spider-web cracking around fixing points. The brackets should sit flat against the wall surface across their entire length.
Selecting Brackets for Your Project
When choosing radiator hanging brackets for a new installation or replacement, several factors guide the decision.
Load Rating
The load rating needs to exceed your radiator's filled weight by a comfortable margin. Manufacturers specify maximum loads, but working at 70-80% of maximum capacity provides a safety margin for unexpected stresses. Calculate your radiator's water capacity, add the radiator's dry weight, and ensure your chosen brackets comfortably exceed this total.
Radiator Type Compatibility
Compatibility with your radiator type matters. Panel radiators, column radiators, and towel rails each need appropriately designed brackets. Using panel brackets on a column radiator might work initially, but it creates stress points that fail over time. Check manufacturer specifications or look at heating system components from Honeywell for compatible bracket options.
Adjustment Range
Adjustment range provides installation flexibility. Brackets with slotted mounting holes or multiple position options let you fine-tune radiator positioning during installation. This adjustability proves particularly valuable in older properties where walls aren't perfectly straight or plumb.
Corrosion Resistance
Corrosion resistance extends bracket life, particularly in bathrooms, kitchens, or coastal properties where humidity and salt air accelerate deterioration. Galvanised or powder-coated brackets cost slightly more but last significantly longer than basic painted steel versions.
Tools and Techniques for Proper Installation
Having the right tools makes bracket installation faster and more reliable.
Drilling Equipment
Drilling equipment needs to match your wall type. A good quality hammer drill with sharp masonry bits handles most situations. For very hard materials, an SDS drill provides more power and better penetration. Keep bits sharp; a worn bit creates oversized, imprecise holes that compromise fixing strength.
Measuring and Marking Tools
Measuring and marking tools prevent errors. A quality spirit level, tape measure, and pencil let you mark accurate fixing positions. A laser level speeds up the process and improves accuracy, particularly when installing multiple radiators in the same room where alignment matters for aesthetics.
Detection Equipment
Detection equipment prevents disasters. A pipe and cable detector identifies hidden services before you drill. Hitting a water pipe or electrical cable turns a simple bracket installation into an expensive emergency. The few minutes spent checking saves potential thousands in damage repair.
Appropriate Fixings
Appropriate fixings for your specific wall type should be on hand before you start. Having the right plugs, screws, or specialist fixings ready prevents mid-job trips to suppliers or compromising on inappropriate alternatives.
Ensuring Long-Term Performance
Radiator hanging brackets might seem like minor components in your heating system, but they perform a critical structural role that affects both safety and performance. The difference between radiators that sit securely on walls for decades and those that become problems within months often comes down to choosing appropriate brackets, matching fixings to wall types, and installing everything with proper attention to detail.
Weight calculations, wall assessment, correct fixing selection, and precise radiator bracket installation all contribute to reliable radiator mounting. Whether you're installing a single replacement radiator or fitting out an entire heating system, the principles remain consistent: understand the loads involved, respect the wall materials you're working with, and use quality components installed to proper standards.
The brackets holding your radiators might be hidden behind the panels, but their performance affects your heating efficiency, prevents water damage from failed installations, and determines whether your radiators still sit level and secure in ten years' time. Taking time to select appropriate brackets and install them properly pays dividends in reliability and peace of mind.
For quality heating components, including radiator hanging brackets and complete heating solutions, Heating and Plumbing World provides professional-grade mounting hardware suitable for all radiator types. Heavy-duty brackets ensure secure installation across different wall constructions. Quality radiators from Myson come with appropriately specified brackets for their weight and dimensions. For technical guidance on radiator bracket installation specific to your wall type, load requirements, or upgrading existing fixings, experienced heating engineers can provide support on secure mounting that protects your heating investment.