
Tundish Installation: Visible Discharge Requirements For Unvented Systems
When an unvented hot water system fails, you really don't want the first sign to be a flooded ceiling or a scorched wall. That is exactly where the tundish comes in. It is a incredibly small but highly critical safety device that makes discharge water visible before it becomes a massive problem.
Think of a tundish like the red warning light on your car dashboard. It immediately alerts you to a serious problem under the bonnet long before your engine actually blows up. A proper tundish installation provides that exact same early warning.
I've seen far too many installations where the device was treated as a complete afterthought. Installers frequently tuck it away in a dark cupboard or connect it directly to drainage without any clear visibility. Consequently, homeowners had no idea their pressure relief valve was weeping for weeks until the ceiling finally collapsed.
The strict regulations around a professional tundish installation aren't just arbitrary red tape. They're specifically designed to give you early warning of system failures while rigorously protecting your drinking water supply. Get it wrong, and you're compromising the safety of the entire property.
What A Tundish Actually Does
A tundish is a funnel-shaped device that creates a physical separation between your discharge pipe and the final drainage point. This separation acts as a crucial checkpoint that lets you see when something is wrong. Sourcing proper components from trusted heating and plumbing supplies ensures these setups function reliably.
The device essentially serves three essential functions for your hot water system:
- It provides a visible discharge point so anyone can quickly spot when water is releasing.
- It creates a physical air gap that guarantees vital back-siphonage prevention.
- It allows you to actually hear the discharge, providing an immediate auditory warning.
Without this vital component, you'd have a direct connection between your dirty drainage system and your clean hot water cylinder. If negative pressure somehow developed in the drainage pipes, it could easily pull contaminated water back into your drinking water. That is exactly the health hazard that Building Regulations are designed to prevent.
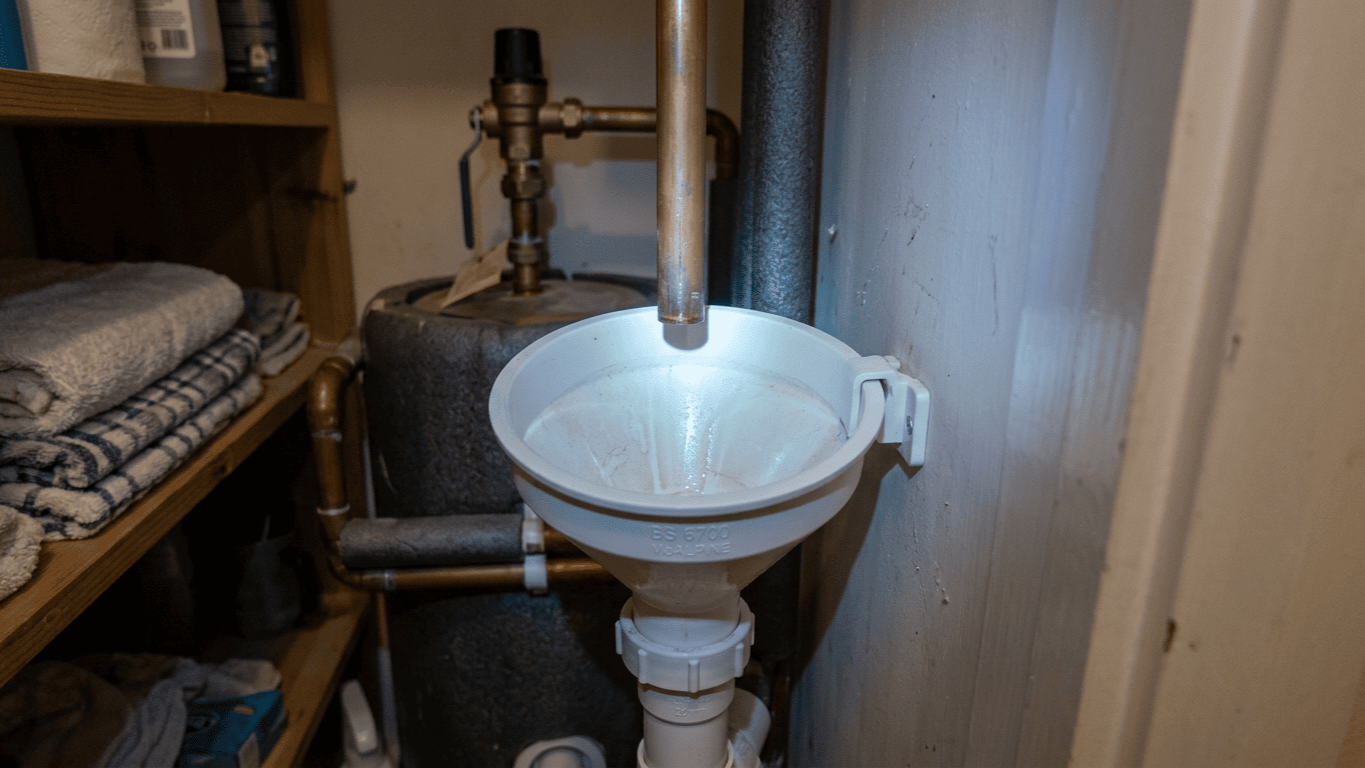
The Visible Discharge Requirement
Building Regulations Part G3 is incredibly explicit about this specific rule. The discharge from a tundish must be completely visible to occupants. It shouldn't be merely sort of visible, or visible only if you open a specific cupboard door.
The regulation clearly states that the device must be installed vertically. Furthermore, it must sit within 500mm of the relief valve and remain in the same space as the cylinder. The final setup must act as a clear visible discharge point so that anyone can see when hot water is escaping.
What does "visible" actually mean in daily practice? The discharge point needs to be positioned where someone would naturally notice water flowing. Common compliant locations include above a bath, over a shower tray, or an external area where the water is immediately obvious.
Positioning Requirements For Compliance
The 500mm distance rule is absolutely non-negotiable for professional installers. Your setup must be installed within 500mm of the temperature and pressure relief valve outlet. This ensures that discharging water reaches the funnel quickly without causing any dangerous back pressure.
Furthermore, the unit itself must be installed perfectly vertically. The funnel must point straight upwards to ensure that any discharge falls cleanly into the opening. Installing it horizontally or at an angle will cause splashing and completely invalidate the safety setup.
The installation must also remain in the exact same space as the main cylinder. For example, if you are fitting a large Kingspan 150-litre unvented cylinder, the safety funnel must stay in that exact same airing cupboard. You cannot run a discharge pipe through a wall into another room.
On a recent domestic project, an installer hid the funnel deep inside a built-in wardrobe to make the pipework look neater. Three months later, a faulty valve discharged continuously for a whole week. It completely ruined the carpets because nobody could see the warning signs.
Discharge Pipe Sizing And Materials
Getting the pipe dimensions right is critical for a safe, compliant system. Proper d1 discharge pipe sizing requires the initial pipe connecting your relief valve to match the valve's outlet diameter. This is typically 15mm for standard domestic systems. Proper d1 discharge pipe sizing ensures that the system handles extreme pressures safely.
You cannot reduce this pipe size under any circumstances. Reducing it would restrict flow during a high-pressure discharge event and severely compromise your safety. From the funnel onwards, the final D2 discharge pipe must be at least one pipe size larger than the relief valve outlet.
For a standard 15mm relief valve, that means your final discharge pipe should be 22mm minimum. This larger diameter ensures that even if the pipe partially blocks with scale, there is still adequate flow capacity.
Copper pipe is the standard material for the section before the funnel. Water discharging from a relief valve can easily reach 100°C. Standard plastic simply cannot cope with those extreme temperatures safely. For the final pipe after the funnel, you could use temperature-rated plastic, similar to materials found in a Firebird plastic flue kit, provided it's properly supported.
Creating The Proper Air Gap
The physical air gap is what separates a compliant installation from a severe health hazard. Building Regulations explicitly demand a strict 20mm air gap requirement between the lowest point of the outlet and the final discharge pipe.
This physical separation offers incredibly robust back-siphonage prevention. Even if negative pressure develops in your drainage system, contaminated water cannot jump that gap. Consequently, your potable drinking water supply remains perfectly safe and uncontaminated.
Always measure this gap carefully during installation. The 20mm air gap requirement is a strict minimum constraint. You can go larger if your specific installation requires it, but you definitely cannot go smaller under any circumstances.
The funnel should also be large enough to catch all discharge without spillage. Standard funnels are perfectly adequate for domestic setups, even when integrating complex components like a Worcester 10-plate heat exchanger into your wider heating system.
Common Installation Mistakes
The absolute biggest mistake we see is the hidden installation. Installers often tuck the funnels away behind panels or in ceiling voids where nobody will ever see them discharge. This completely defeats the core purpose of creating a visible discharge point.
Another incredibly frequent error is incorrect d1 discharge pipe sizing. Some installers foolishly try to reduce the pipe size to make routing easier through tight floor spaces. This dangerous practice restricts flow and drastically compromises the relief valve's emergency operation.
Horizontal installation is also surprisingly common, despite being explicitly non-compliant. The device must be perfectly vertical to create the proper gap. This ensures the scalding discharge falls cleanly and safely into the funnel.
I've also encountered dangerous installations terminating directly into a close-coupled WC suite without proper venting. The discharge point must always remain visible, incredibly safe, and entirely free from obstruction.
Testing And Commissioning
Once you've finished the tundish installation, you must meticulously verify the setup is fully functional. Start by confidently checking the overall positioning. Confirm it sits within 500mm of the valve, is perfectly vertical, and remains in clear view.
Next, measure the physical gap to ensure it meets the strict 20mm air gap requirement. This specific check is absolutely critical for establishing effective back-siphonage prevention, so do not skip this step during commissioning.
Test the relief valve by lifting the test lever briefly. Water should discharge cleanly through the funnel. You should be able to see and hear it clearly. If water sprays outside the funnel, the entire installation needs immediate adjustment.
Maintenance Considerations
The device itself requires minimal ongoing maintenance, but it is certainly worth checking periodically. Scale buildup can occur rapidly in hard water areas. This heavy scale can potentially reduce the effective gap or completely block the funnel.
Inspect the setup annually when you service the main unvented cylinder, such as a Crown Hi-Store vertical cylinder. Look closely for specific signs of regular discharge, like fresh water staining or hard mineral deposits.
If you spot any discharge pooling in the funnel, do not ignore it. A properly functioning system simply shouldn't discharge except during routine maintenance testing. Regular discharge usually indicates a severe underlying problem with the expansion vessel or the pressure reducing valve.
Regional Variations And Standards
While Building Regulations Part G3 applies strictly across England and Wales, Scotland has its own specific requirements. However, the fundamental safety principles always remain the same across the UK.
For complex installations, professionals always refer to the bs 6700 standard. The bs 6700 standard provides incredibly detailed guidance on unvented hot water systems. Following the bs 6700 standard ensures your pipe diameters are always correct for unusual scenarios not explicitly detailed in basic Building Regulations.
Some local water authorities also have additional requirements for discharge pipe termination. Always check with your local authority before finalising a complex commercial installation.
Conclusion
A proper tundish installation might involve one of the smallest components in an unvented hot water system. However, it is easily among the most important features for absolute safety and compliance. Installing it correctly protects both the expensive system and the people who rely on it daily.
The basic requirements simply aren't that complicated. Position it within 500mm, install it vertically, maintain the correct air gap, and ensure the discharge terminates safely. Follow these straightforward rules, and you'll have a perfectly compliant setup.
Every shortcut creates a potential failure point that could have been easily avoided. Take the necessary time to do it properly. Your future self will thank you when that early warning prevents a massive disaster. If you need any advice on achieving perfect compliance, please speak to our team today.