
Unvented Cylinder Pressure Testing: Installation Commissioning Procedures
Unvented hot water cylinders have completely changed how we deliver domestic hot water in the UK. However, they aren't something you can simply fit and forget. Because these systems operate at high mains pressure, proper unvented cylinder pressure testing isn't just good practice. It is actually a strict legal requirement under the Building Regulations. Get it wrong, and you're looking at property damage, scalding injuries, or worse.
In our experience commissioning hundreds of cylinders, the pressure testing phase is where installers take the most shortcuts. Consequently, it is also where most failures show up years down the line. A cylinder that hasn't undergone rigorous unvented cylinder pressure testing during installation might work fine for six months. Then, it can fail catastrophically when a temperature relief valve doesn't operate as designed.
The G3 qualification exists for a very good reason. These aren't your traditional vented systems with an open pipe venting to the atmosphere. Instead, they are sealed pressure vessels. Therefore, they require methodical installation commissioning procedures at every single stage.
Why Pressure Testing Matters For Unvented Systems
Unvented cylinders operate at mains pressure, which is typically between 3-6 bar depending on your location. That is roughly 43-87 PSI pushing heavily against every seal, joint, and component in the system. When you heat water in a sealed vessel, thermal expansion creates additional pressure that safety devices must manage. Think of an unvented cylinder like a pressure cooker on a hot stove. Without properly tested relief valves to safely vent the excess pressure, the vessel will eventually rupture.
Whether you are fitting new parts or sourcing reliable heating and plumbing supplies, it is critical to remember what we are actually testing for. Here is what you must verify during commissioning:
- System integrity: Every connection, from the cold feed to the discharge pipework, must hold pressure without leaking.
- Safety valve operation: Temperature and pressure relief devices must activate accurately at their rated settings.
- Expansion vessel pre-charge: The vessel must have the correct air pressure to safely accommodate thermal expansion.
- Discharge route verification: Relief valve discharge must terminate safely where scalding water won't cause injury.
I once arrived at a property where another installer had commissioned a cylinder but completely skipped the testing sequence. The homeowner called us six weeks later when water started seeping through their kitchen ceiling. What happened? The expansion vessel hadn't been checked, and the PRV was cycling constantly. Furthermore, a compression fitting on the cold feed had been slowly weeping. That was £3,000 of ceiling damage that proper commissioning would have easily prevented.
Pre-Installation Checks Before Any Testing Begins
Before you even think about pressure testing, verify the installation meets basic requirements. We run through a specific checklist on every job because catching issues now saves hours of fault-finding later. Here is our essential pre-installation checklist:
- Check the expansion vessel sizing: The vessel must be correctly sized for the cylinder capacity and incoming mains pressure. For example, a 150-litre cylinder typically needs an 8-12 litre vessel. If you are installing a Zilmet Hy-Pro expansion vessel, verify its specifications match the system volume before proceeding.
- Verify all safety device ratings: The temperature and pressure (T&P) relief valve must match the cylinder specification. Standard T&P valves are rated for 7 bar and 90°C. Additionally, the pressure reducing valve (PRV) should be set to manufacturer recommendations, which is usually 3-3.5 bar.
- Confirm discharge pipework compliance: The discharge pipe must be metal, a minimum of 15mm in diameter, and feature no reduction in size. Furthermore, it must terminate in a visible, safe location and be fitted with a proper tundish.
- Inspect the cold feed arrangement: The cold supply must include a line strainer, a PRV, and an expansion relief valve. You must install these in the exact sequence specified by the manufacturer.
Expansion Vessel Pre-Charge Testing
The expansion vessel is your first critical test point. Checking the expansion vessel pre-charge is absolutely vital. This component absorbs the extra volume when water heats up in the sealed system. If it isn't properly charged, the system can't accommodate thermal expansion. As a result, the PRV will discharge during every single heating cycle.
First, isolate the vessel from the system by closing the isolation valve. If there isn't an isolation valve installed, you will need to drain the cylinder to test the vessel properly.
Next, check the air pre-charge pressure. Remove the dust cap from the Schrader valve on the expansion vessel. Use a proper, calibrated pressure gauge reading in bar to test the expansion vessel pre-charge. Typically, this should be set to 0.5 bar below the PRV setting.
For instance, if your PRV is set at 3.5 bar, you want the expansion vessel pre-charge set to 3.0 bar. If you are servicing a Worcester boiler expansion vessel, we highly recommend using a hand pump with an integrated gauge. This gives you precise control and immediate feedback.
Finally, test for diaphragm failure. When you press the Schrader valve core, you should get air rather than water. If water comes out, the internal diaphragm has failed, meaning the vessel needs replacement. Adjust and retest if necessary until you hit the exact target pressure.
Cold Water Pressure Testing Sequence
With the expansion vessel confirmed, you can now test the cold water side. This step verifies all connections before you introduce any heat. Thorough installation commissioning procedures start right here.
Start by filling the system slowly. Open the cold feed isolation valve gradually to prevent trapping air in the cylinder and pipework. Rushing this step will cause major issues later. We typically take 10-15 minutes to fill a 150-litre cylinder, bleeding air from the T&P valve as we go.
Once filled, the system should stabilise at mains pressure. Typical UK mains pressure ranges from 2-5 bar. At this point, perform a thorough visual inspection under pressure. Check every single joint and connection for weeping at compression fittings or moisture around the immersion heater boss.
Next, hold the pressure for 30 minutes. Sadly, this is the step most installers skip. Leave the system pressurised and check your gauge reading after 30 minutes to complete a proper pressure hold test. A pressure drop of more than 0.2 bar indicates a leak, so find and fix it before moving on.
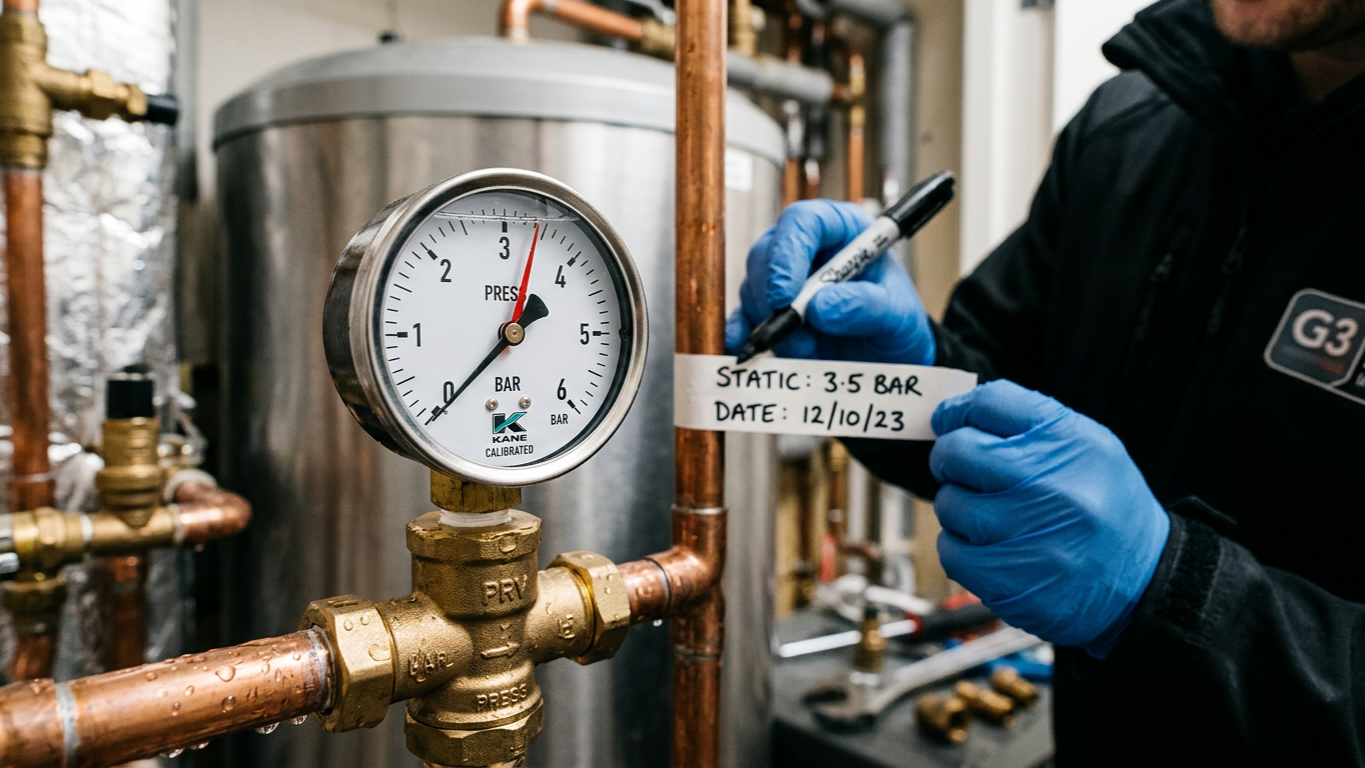
We like to mark the initial pressure reading with a marker on a piece of tape stuck to the gauge face during the pressure hold test. This makes it dead easy to spot any drop. On a recent commercial fit-out, a subcontractor rushed his pressure hold test and missed a weeping compression joint hidden behind a joist. Two days later, that tiny leak completely ruined the plasterboard ceiling below, wiping out our profit margin.
Temperature Relief Valve Function Testing
The T&P valve is your very last line of defence against dangerous over-pressure conditions. Testing it properly could genuinely prevent a cylinder explosion years down the line. Sometimes, a faulty Gledhill temperature sensor can cause false electronic readings. Therefore, testing the mechanical relief valve is absolutely critical.
First, locate the test lever on top of the valve. Before operating it, ensure a colleague is watching the discharge point outside. You are about to send a surge of water through the discharge pipe.
Next, operate the valve manually by lifting the lever fully. You should get immediate water discharge from the tundish. The flow exiting the final discharge point should be substantial. A weak discharge suggests the valve is blocked or undersized.
Finally, check for proper reseating. Release the lever and verify the discharge stops completely within 2-3 seconds. If it continues to drip, the valve seat is likely contaminated with debris. Always walk outside and confirm you can clearly see the discharge point to verify route visibility.
Heat-Up Testing And Thermal Expansion Verification
This stage proves the system can handle real-world operating conditions. You're testing exactly what happens when you heat 150+ litres of water inside a sealed vessel. Executing a proper thermal expansion verification guarantees long-term safety.
Start by setting the thermostat to maximum. You should temporarily override any temperature limits to get the cylinder to full operating temperature. Most unvented cylinders are set to 60-65°C for legionella control. However, you want to test at the absolute upper limit for commissioning.
As the water heats, closely watch your pressure gauge to complete your thermal expansion verification. You should see the pressure rise as thermal expansion occurs. The expansion vessel should absorb this volume increase without the PRV operating. A typical pressure rise is 0.5-1.0 bar during heat-up.
During normal heat-up, ensure the PRV remains closed and does not discharge. If it does, you likely have insufficient expansion capacity or a faulty set point. Once at operating temperature, verify the T&P valve during your final thermal expansion verification. If you have a Baxi assembled temperature sensor installed, monitor its electronic readings closely alongside the mechanical valves.
Pressure Reducing Valve Testing And Adjustment
If your installation includes a PRV, you must verify it is set correctly and functioning properly. Accurate pressure reducing valve adjustment prevents unnecessary stress on the system components.
First, check the outlet pressure by installing a gauge on the downstream side. With water flowing, the outlet pressure should match the PRV setting, typically 3.0-3.5 bar. Next, test under no-flow conditions by closing all taps to check the static pressure. It should remain steady and not creep up toward the incoming mains pressure.
Next, verify the internal strainer. Most PRVs have an integral strainer on the inlet side. After the initial commissioning phase, we always remove and inspect this. You'd be surprised how much debris comes through a supposedly clean mains supply. A blocked strainer causes pressure fluctuations and premature PRV failure.
Finally, adjust the valve if necessary. Most PRVs have an adjustment screw hidden under a protective cap. When performing a pressure reducing valve adjustment, turning clockwise increases the pressure, while turning anticlockwise decreases it. Make very small turns during your pressure reducing valve adjustment, as a quarter turn changes pressure by roughly 0.5 bar. Ensure you aren't overloading sensitive internal components like an IMIT limit thermostat with excessive pressure.
Documentation And Handover Requirements
Your job isn't finished until the paperwork is complete. This isn't just bureaucracy; it provides legal protection for you and essential information for the property owner. Strict installation commissioning procedures demand thorough and accurate documentation.
Always complete the manufacturer's commissioning checklist. Fill it out completely, including all test results, pressure readings, and valve settings. We always photograph the completed checklist and email it directly to the client on the same day.
You must also provide the benchmark logbook. Under Building Regulations, you are required to leave a completed logbook with the property owner. This vital document includes installation details, system design pressures, and safety device ratings.
Before leaving, demonstrate the system to the user. Walk the property owner through the isolation valves and explain what the discharge pipe actually does. Show them exactly who to call if they see a discharge occurring. Furthermore, you must issue the Building Control notification, as this is your legal responsibility.
Common Commissioning Failures And How To Avoid Them
After years of fault-finding on other installers' work, we see the same mistakes repeated constantly. Ensure your installation commissioning procedures actively account for these common, easily avoided pitfalls:
- Incorrect expansion vessel pre-charge: This is the number one failure point. Either the vessel isn't checked at all, or it is charged to the wrong pressure. Always verify the pre-charge before filling the system.
- Undersized or incorrectly routed discharge pipework: We've found discharge pipes terminating into sealed drains or routed horizontally with no fall. These are dangerous non-compliances. The discharge must be visible and correctly sized.
- PRV set too high: Some installers set PRVs to 4-5 bar, thinking higher pressure gives better showers. This heavily over-stresses the cylinder. Stick to the manufacturer recommendations, which are usually 3.0-3.5 bar.
- Skipping the pressure hold test: Filling the system and checking for obvious leaks simply isn't enough. Skipping the 30-minute hold test is a massive risk that often leads to severe property damage.
Conclusion
Proper unvented cylinder pressure testing simply isn't something you can rush through in 20 minutes. Each testing phase serves a very specific purpose. It verifies that safety systems will function correctly throughout the cylinder's entire service life.
The pressure testing sequence proves the installation can safely handle both normal operation and fault conditions. If you skip any step, you are gambling with system integrity and occupant safety.
We treat every commissioning job as if we'll be called back to fault-find in five years' time. That professional mindset keeps the testing methodical and the documentation complete. Proper unvented cylinder pressure testing discipline is what separates professional installations from massive liability risks. If you need assistance with compliance or selecting the right test equipment, be sure to get expert advice from our dedicated technical team.